
This tutorial will introduce you to the basics of using brainCloud in Blueprints. We will start by setting up the BrainCloudClient, then authenticating and making a few simple API calls. Finally, we will go over parsing JSON in Blueprints.
Prerequisites
- Created a brainCloud Portal account
- Created a game in the brainCloud Portal. If you need help with this step refer to the Unity Tutorial #1 video.
- An Unreal project with the brainCloud plugin installed as described here
- Basic experience with Blueprint, see the Unreal documentation for help
Initialization
Before you can do anything with brainCloud the BrainCloudClient must be initialized. This is accomplished by providing your App’s details to the Client via the Initialize function.
To keep things simple we will do everything in the Level Blueprint and off of the Event BeginPlay node.
Start by dragging off of the Event node and adding the Initialize function node. You can find it by just typing “initialize” and selecting it under the “Client” category, or you can find it manually by looking in BrainCloud>Client.
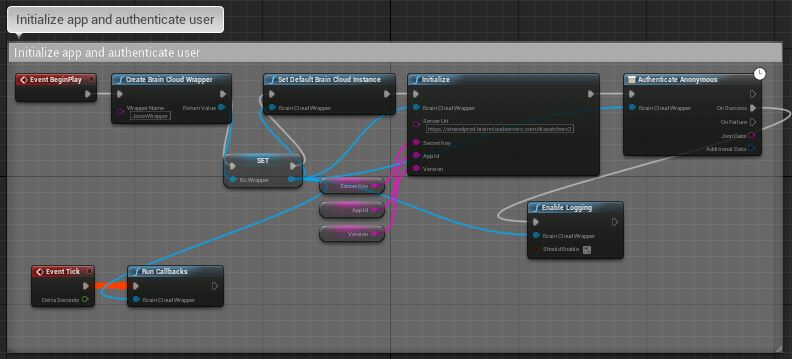
You should now have the Initialize node on the Graph. The information you need to initialize comes from the Core App Info > Application IDs page in the brainCloud web portal.
- Server Url – The URL (default value: https://sharedprod.braincloudservers.com/dispatcherv2) of the brainCloud server to connect to. You should not have to change this.
- Secret Key – The App Secret for your application
- App Id – The game (or in the portal page App ID) of your application
- Game Version – The current version of your application
You should set the default values of these variables of secrect key, app id and game version in your blueprint, by doing that, you can use get-version to get their values respectively.
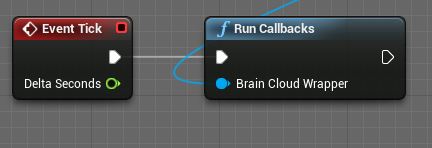
Updating the Client
The BrainCloudClient relies on its Run Callbacks function being called every frame, without this, all your API calls will receive no responses! The easiest way to set this up is to attach the Run Callbacks function node (which can be found under BrainCloud > Client) to the Level Blueprint’s Event Tick node.
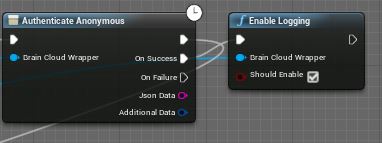
Debug Logging
Logging can be an invaluable tool when working on your project. By default logging is disabled in brainCloud, however, it can easily be enabled by calling the Enable Logging function (which can be found under BrainCloud > Client). Logging can just as easily be disabled with the same function.
BrainCloud will log many things, but among the most useful are the JSON requests and responses. To view the logs you need to open the Output Log window in the Unreal Editor, found under Window > Developer Tools > Output Log.
Let’s enable logging after we authenticate:
The brainCloud Node Structure
Let’s go over the structure that all server-communicating brainCloud Blueprint nodes use.
This is a Latent node, meaning it has execution paths that are delayed. There are three execution pins:
- Immediate – Executes immediately, continuing the execution path that triggered the node
- On Success – Executes when a successful response is received
- On Failure – Executes when an unsuccessful response is received and the call has failed
The next return parameter Json Data is a JSON-formatted string. The return of this is conditional on the success or failure of the call, returning either the data specified by the API call made or the error information. We will get into parsing this string later in the tutorial.
Finally, there is the Additional Data struct. This contains extra information that may be useful depending on the situation. It contains:
- Service Name – The name of the service the API call belongs to
- Service Operation – The specific operation performed by the API call
- Status Code – The status code returned by the call.
- Reason Code – The reason code describes specific failures and is returned when an error is encountered. You can view the various reason codes here.
All brainCloud API calls that communicate with the brainCloud server will have this return structure.
Authentication
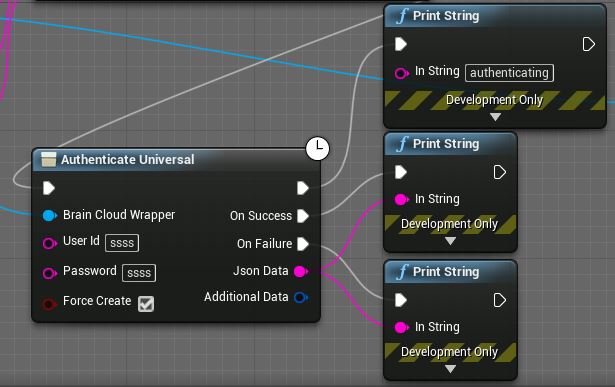
Authentication is the next step and is required before calling any other brainCloud APIs. Create a new Authenticate Universal node, which can be found under BrainCloud > Authentication.
By now you should have these nodes set up and connected in order:

Next, we will add some debug log messages to get a feel for how the different execution paths function.
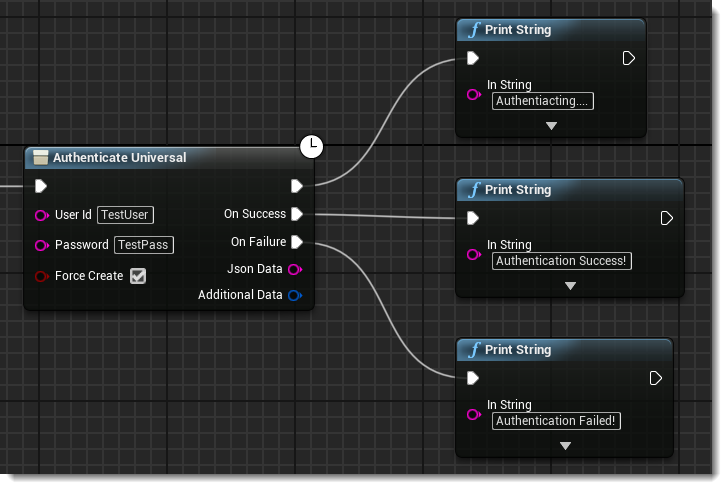
The first execution pin fires immediately, continuing the execution path that triggered the Authenticate node in the first place. This makes it suitable for printing the “Authenticating…” message.
The next execution pin, On Success, will fire when a successful result is returned from the server, so we print the “Authentication Success!” message.
Finally, the On Failure execution pin will fire if an error is encountered, so we print the “Authentication Failed!” message.
At this point, you should be able to compile your Blueprint, run it, and see the “Authenticating…” and “Authentication Success!” messages. If not, review the steps again and check the Output Log to debug your Blueprint.
Calling the API
Once we’ve successfully authenticated let’s call a few more API functions.
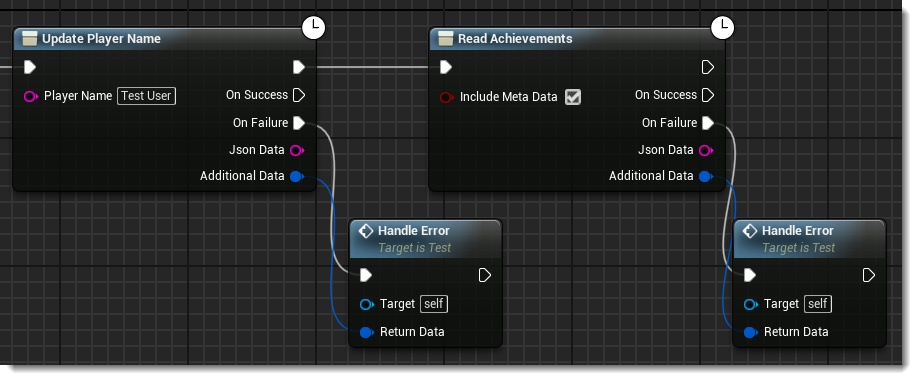
Continuing off the On Success path of our authentication node we’ve added an Update Player Name node (BrainCloud > Player State) and a Get Achievements node (BrainCloud > Gamification).
Note that we are using the first execution pin, which we learned earlier will execute immediately, so we are not waiting for the Update Player Name to succeed or fail before calling Get Achievements. These operations do not depend on one another, so there is no issue with triggering them both at the same time.
We’ve also implemented a generic Handle Error function and connected it to the On Error pins of both functions. This way we can handle either error without duplicate code.
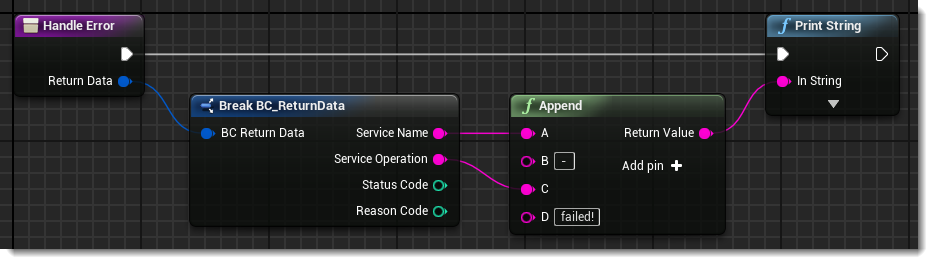
You can see inside our Handle Error function that we use the Service Name and Service Operation of the additional return data to output an error log that specifies what call has failed.
JSON Parsing in Blueprint
Parsing the Json Data string is essential to using brainCloud and it requires the use of a third-party plugin. There are several options available (we leave that up to you to decide) but for this tutorial we will be using the VaRest plugin available here.
First, we will need to make another API call to parse the return from, in this case, ReadServerTime which will return the current server time (BrainCloud > Time). We can see the JSON return structure on the documentation page so we know what we will be looking for when we parse the JSON.
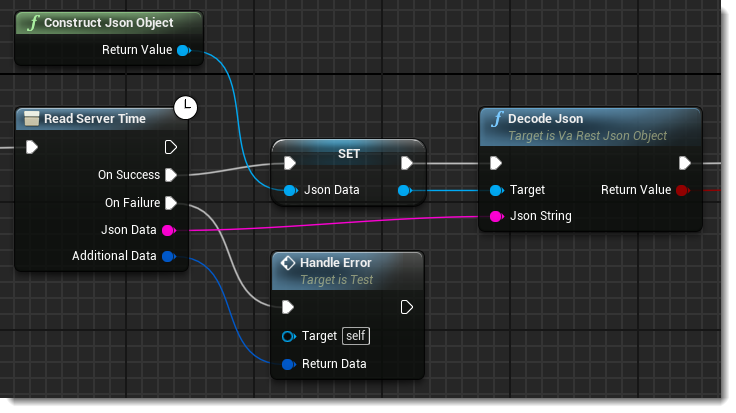
You can see here that On Success we are doing two things, constructing a new Json Object (a VaRest type) and decoding the Json Data response into it.
Constructing the Json Object is done by calling the Construct Json Object function in VaRest. Next we save the constructed object to a Local Variable using that variable’s Set.
Now we will decode the JSON, which is simply a call to the VaRest function Decode Json. We pass in our newly created Json Object as well as our Json Data string.
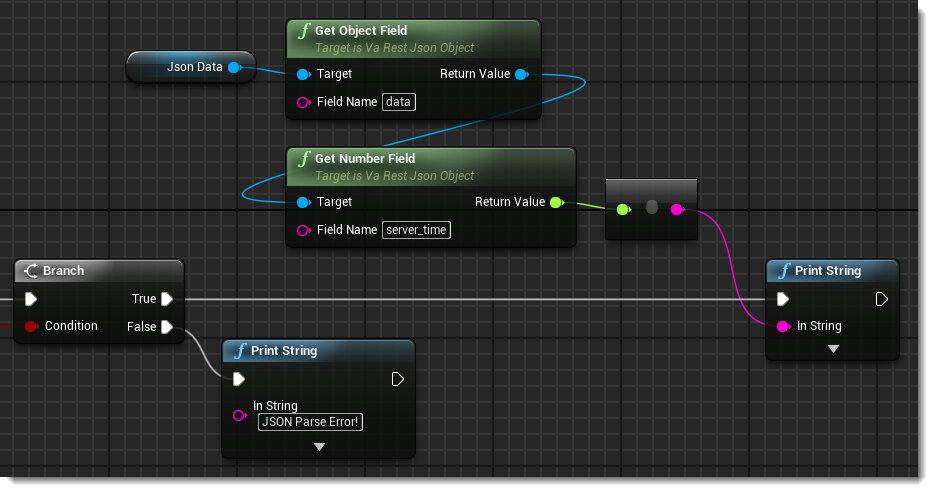
The next step is to check if the Decode Json call was successful by branching off of its Return Value boolean. If it was, we now want to dig through the data and print the current server time.
Referring to the JSON return structure in the documentation we can see that the server time is represented by the key “server_time” which is contained in the object “data”. So to get to it we take the Json Data object we saved to a variable and use the VaRest functions Get Object Field and then Get Number Field, passing in “data” and “server_time” as our Field Names.
Lastly, we do a conversion from a float to a string and print the result.