
brainCloud support two varieties of S2S calls: with and without explicitly-allocated sessions.
- session-less
- simpler, but less efficient
- a disposable
sessionIdis automatically generated on the server (via authentication), and disposed of after the call - this takes time and costs an additional API count
- session-based
- faster and less expensive!
- supports request bundling
- to use, you must first authenticate (similar to the Client API) to retrieve a sessionId, and then use that sessionId in future calls while incrementing the packetId associated with the message
Note – the session-based S2S protocol, like the client protocol, supports the bundling of several API calls within a single HTTP request. In most circumstances it is more practical to combine the calls into a single cloud code script instead.
Overall, the session-based S2S protocol is recommended for production applications, because it eliminates the redundant creation of disposable sessions. It performs better and costs you less! This tutorial will show you how to simulate both types of requests via Postman.
Installing PostMan
To install Postman, simply:
- Download from https://www.getpostman.com/
- Choose your platform, and complete the installation process
Pre-requisite: Configuring S2S Servers
Incoming servers must be configured (i.e. declared) in the brainCloud dashboard before making S2S calls. This allows brainCloud to confirm that the requests are coming from a server that you own and aren’t malicious.
- Launch the brainCloud Portal
- Navigate to the Design | Cloud Code | My Servers page. Click the [+New Server] button
- Give your server a name, like “EXAMPLE_SERVER”
- Entering IP ranges restricts access to requests coming from the specified network addresses. This is highly recommended for production apps! For now, you can leave the ranges blank. This will make all IP ranges acceptable.
- Hit [Save], and note your server secret – you will use it later.
Session-less S2S Requests
Session-less requests are simple. Each request is completely independent – no sessionIds or packetIds to manage. This API is best when calls into brainCloud are few and far between.
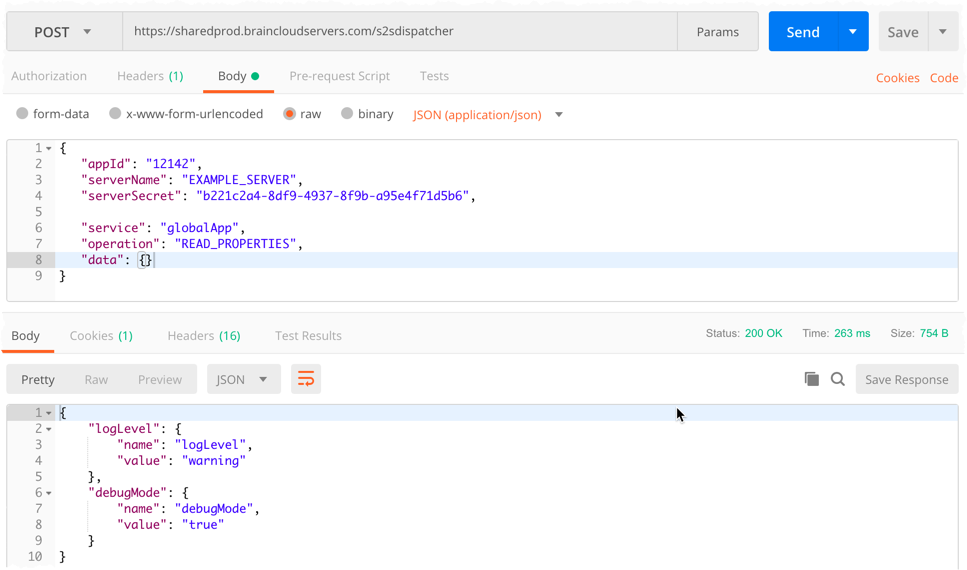
To simulate a session-less server request with Postman:
- Launch Postman
- Add a new Request
- Set the request type to POST
- Set the request URL to: “https://sharedprod.braincloudservers.com/s2sdispatcher“
- In the Body section of the request, choose raw and set the type to JSON (application/json)
- Copy this JSON into the body, setting the
appId,serverNameandserverSecretappropriately for your app
{
   "appId":"12142",
   "serverName":"EXAMPLE_SERVER",
   "serverSecret":"b221c2a4-8df9-4937-8f9b-a95e4f71d5b6",
   "service":"globalApp",
   "operation":"READ_PROPERTIES",
   "data":{

   }
}
- Select [Send]
- View the Response
Unless you have added some properties, you will see an empty JSON response.
To change this, go to the Design | Custom Config | Global Properties page of the brainCloud Portal and configure a property or two – then run this request again. Voila!
Session-based S2S Requests
Session-based requests require you to first request a sessionId to use via the Authenticate operation. You then reference that sessionId in subsequent requests, along with an incrementing packetId.
First, we need to Authenticate to get a SessionId
- From Postman, Add a new Request
- Set the request type to POST
- Use the same request URL: “https://sharedprod.braincloudservers.com/s2sdispatcher“
- In the Body tab of the request, choose raw and set the type to JSON (application/json)
- Copy this JSON into the body, setting
the appId, serverNameandserverSecretappropriately for your app - (in both places!)
- View the response, and save
the sessionIdthat is returned. - Now, make a second request, using that
sessionIdand setting thepacketIdto1 - For each subsequent request, be sure to increment the
packetId. Try this one:
{
   "packetId":0,
   "messages":[
       {
         "appId":"12142",
         "service":"authenticationV2",
         "operation":"AUTHENTICATE",
         "data": {
            "appId":"12142",
            "serverName":"EXAMPLE_SERVER",
            "serverSecret":"b221c2a4-8df9-4937-8f9b-a95e4f71d5b6"
          }
       }
   ]
}
- View the response, and save the
sessionId that is returned. - Now, make a second request, using that
sessionId and setting thepackedId to 1
{
   "sessionId":"df5gelac0mhrpht31ffgtgatoe",
   "packetId":1,
   "messages":[
      {
         "service":"globalEntity",
         "operation":"CREATE_SYSTEM_ENTITY",
         "data":{
            "entityType":"address",
            "timeToLive":null,
            "acl":{
               "other":1
            },
            "data":{
               "street":"1309 Carling"
            }
         }
      }
   ]
}
- For each subsequent request, be sure to increment the
packetId. Try this one:
{
   "sessionId":"df5gelac0mhrpht31ffgtgatoe",
   "packetId":2,
   "messages":[
      {
         "service":"globalEntity",
         "operation":"GET_LIST",
         "data":{
            "where":{
               "entityType":"address"
            },
            "orderBy":{

            },
            "maxReturn":50
         }
      }
   ]
}
So, you get the idea.
Important things to remember:
- Always increment the
packetId– except for identical retries. If you’re retrying the same request because of a communications failure, you should keep thepacketIdthe same (it helps the server to prevent duplicate operations from happening). If you got a response from the server though, successful or not, you should increment the packetId for you next request.
Service and Operation Codes
The API calls documented in the API Ref (https://getbraincloud.com/apidocs/apiref/?raw#s2s) are mapped to discrete Services and Operations on the server.
The codes, together with operation-specific parameters (specified in the JSON data object) are used to send commands to the server.

Only the API Calls in the S2S section of the API Ref can be used for S2S calls.